Welcome to Cadence
Cadence is a harmonic progression tool that was built to give composers and musicians a helping hand and a spark of creativity when making music.
Installation
After downloading the .PKG or .EXE file, double-click it to open the installer. The installer will install the standalone, VST3, and (Mac-only) AU / AU MIDI effect versions on your computer. Your DAW should be able to recognize the newly installed plugin on the next launch (or restart of your computer). If not, use your DAW's plugin manager to refresh the plugin list.
Activation
Cadence runs in demo mode for 20 minute sessions for 14 days. It is fully-functional during this time except for exporting MIDI and saving progressions. In order to activate it with your license, start the standalone application or load a new instance of Cadence in your DAW. You'll be presented with an activation prompt. Paste in your license key and choose activate. You can confirm the activation status by clicking the Cadence logo in the top left of the toolbar.
Layout
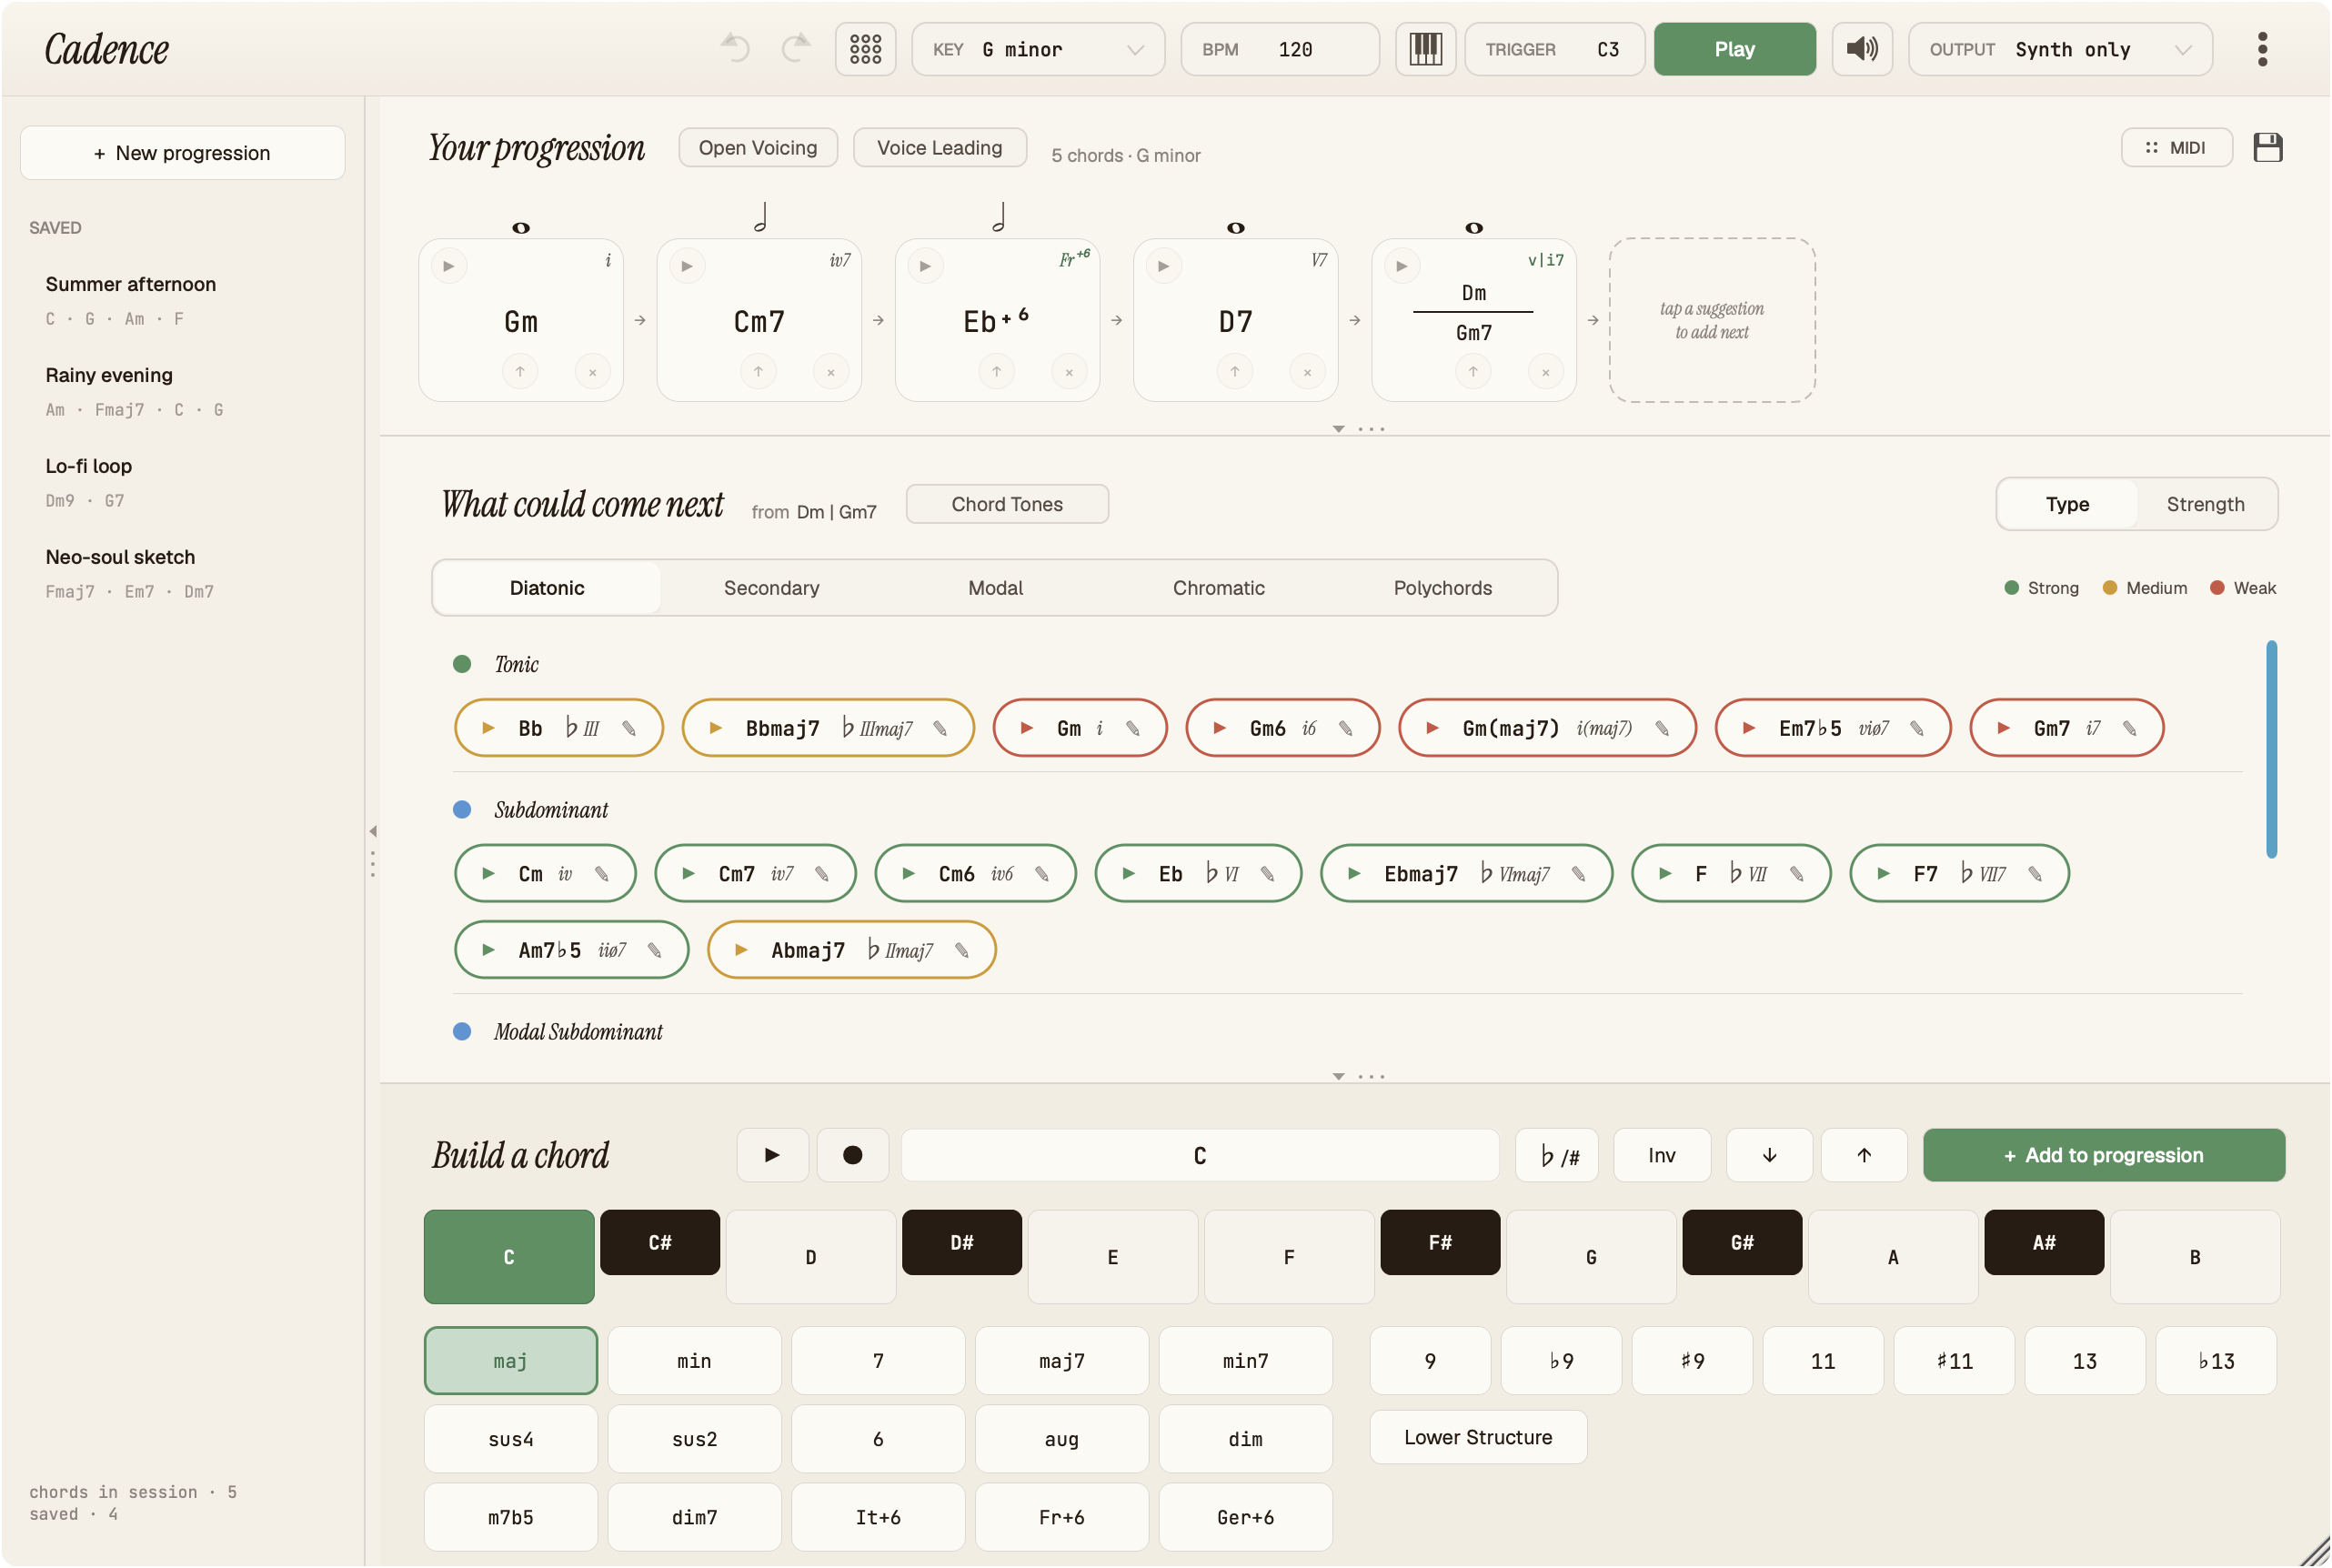
Cadence consists of 5 primary sections:
- the top toolbar
- the saved progressions list
- the progression
- the chord suggestions
- the build a chord section
The vertical and horizontal separation bars between each section allow you to resize the layout or collapse and expand specific sections depending on your needs. We'll cover each section in more detail below.
The Toolbar Section
The top toolbar contains a number of important global functions and configuration options.

Cadence Logo and Undo / Redo
Starting from the left, you have the Cadence logo. Click this to see which version of the app you are using.
After that you have undo and redo buttons, which allow you to control changes you make to your harmonic progression.
MIDI Input Listen
Enabling this will route your MIDI keyboard's input into Cadence so you can play in specific chords, trigger chord cells, record patterns, and more. By default, it is enabled.
Capture MIDI
Clicking on this will enter Capture MIDI Mode, which allows you to capture MIDI from your DAW's timeline. This is particularly useful for harmonzing a melody part you have already written (if the MIDI is monophonic) or analyzing a chord progression you may have (if the MIDI is polyphonic). Cadence will capture MIDI that is on its own track once you start DAW playback. This is discussed in more detail below.
This functionality is not available for the standalone app.
Pattern Mode
Next is the Pattern Mode button. This is a very powerful feature that we'll cover in more detail below.
Key
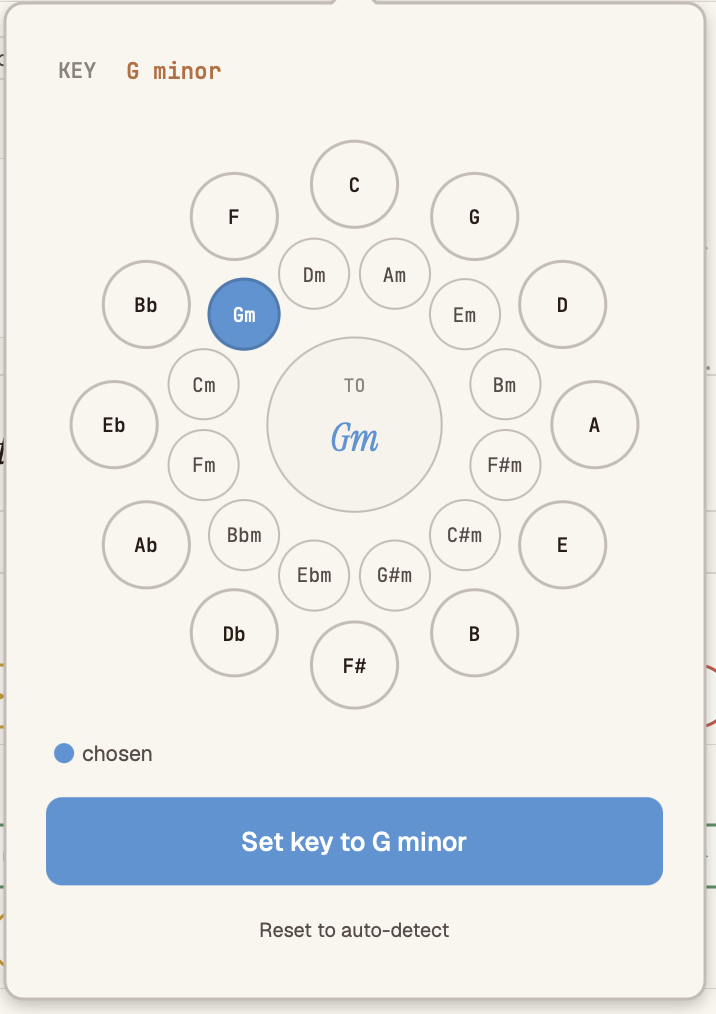
This shows the starting key for the harmonic progression. You can change this by clicking on it to reveal the key change popup.
If you change this when you already have chords in your harmonic progression, a confirmation dialog will show asking if you want to change the starting key or transpose the progression based on the new key.
Choosing a new starting key will update the roman numerals (where possible) to reflect how those chords fit into the new key.
Choosing transpose will transpose all the chords in the progression to the equivalent chords in the new key. It will also adjust any modulations you have in the progression to modulate the same distance from the new key.
Resetting the key to auto-detect will try to determine the right key based on the chords you've added to the progression.
BPM
You can use this field to set the BPM for the playback of your progression. If you are using Cadence as a plugin within your DAW, the BPM is initially synced to your DAW's tempo when you load the plugin.
Meter
You can use this field to set the time signature for your progression. If you specify a meter, Cadence will also show measure indicators along with whether each measure has the correct number of beats. Cadence defaults to free meter.
Key Trigger
The key trigger icon toggles on and off key trigger mode. In this mode, you can use your MIDI keyboard to trigger each chord in the progression. The trigger key starting note can be set in the trigger field (default is C3 which is middle C in most cases). Each subsequent half step note triggers the next chord in the progression.
DAW Playback Sync
This link toggle controls whether starting playback in your DAW also simultaneously starts playback of the progression in Cadence. Cadence will always start with the first chord in the progression, regardless of where in the DAW timeline you start playback.
Note: This button is not applicable to the standalone version.
Play Button
Use this button to playback your harmonic progression.
Volume
Use this slider to control the output volume of Cadence for both progression playback and for previewing chords. If you are using Cadence to output MIDI to another sound source (for example, another virtual instrument in your DAW), the volume slider will control the MIDI velocity that Cadence outputs.
Output
This dropdown allows you to control Cadence's output. You can use the built-in synth sound, MIDI out from Cadence to another sound source, or both.
Option Menu
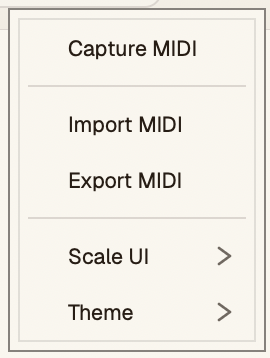
This menu shows a few important options for Cadence.
Capture MIDI
As mentioned above, this allows you to record MIDI from your DAW directly into Cadence. You can then either harmonize the melody (if the MIDI is monophonic) or detect chords from the MIDI (if the MIDI is polyphonic). We will discuss this in more detail below. This option is not applicable to the standalone version.
Import MIDI
This option allows you to import MIDI from a MIDI file on your computer. You can then either harmonize the melody (if the MIDI is monophonic) or detect chords from the MIDI (if the MIDI is polyphonic). We will discuss this in more detail below.
Export MIDI
This option allows you to export your harmonic progression's MIDI into a MIDI file on your computer. It includes any pattern you've applied to the progression.
Scale UI
Use this option to scale the UI up or down based on what is most comfortable for your screen resolution.
Theme
Cadence comes with a light (default) and dark theme. You can switch between the two here depending on your preference.
Sound
Cadence comes with a set of internal sounds, like an electric piano and a string pad. You can set the sound for the chords and for the melody (for the Harmonize Melody flow) with this submenu.
Settings
Additional settings can be accessed here:
- Whether chord tone filtering is automatically set when harmonizing melodies.
- Whether you'd like melodies to be exported with the chord progression MIDI (when harmonizing melodies).
- Whether each chord voice should be exported on its own MIDI track (useful for things like string arranging).
- Whether starting silence / empty measures are automatically trimmed when importing or capturing MIDI for chord detection.
Manual
This will open a browser linking to this manual.
Watch Tour
This will restart the initial welcome and interface tour.
Audio / MIDI Settings
In the standalone version, you can use this option to configure your audio and MIDI settings for Cadence, including your MIDI input devices.
New and Saved Progressions
You can create new and save your existing harmonic progressions from Cadence. Saved progressions will show up in the left-side panel. When saving a progression, you can also define a folder to save that progression in or choose from existing folders.
Creating a new progression when you already have chords in the existing progression will first ask for your confirmation if you want to overwrite the existing progression.
If you create a pattern, that will also be saved when you save a progression.
To delete a saved progression, hover over it in the left panel and click the delete icon. Remember, this cannot be undone! Deleting all progressions within a folder will automatically delete the folder as well.
Your Harmonic Progression
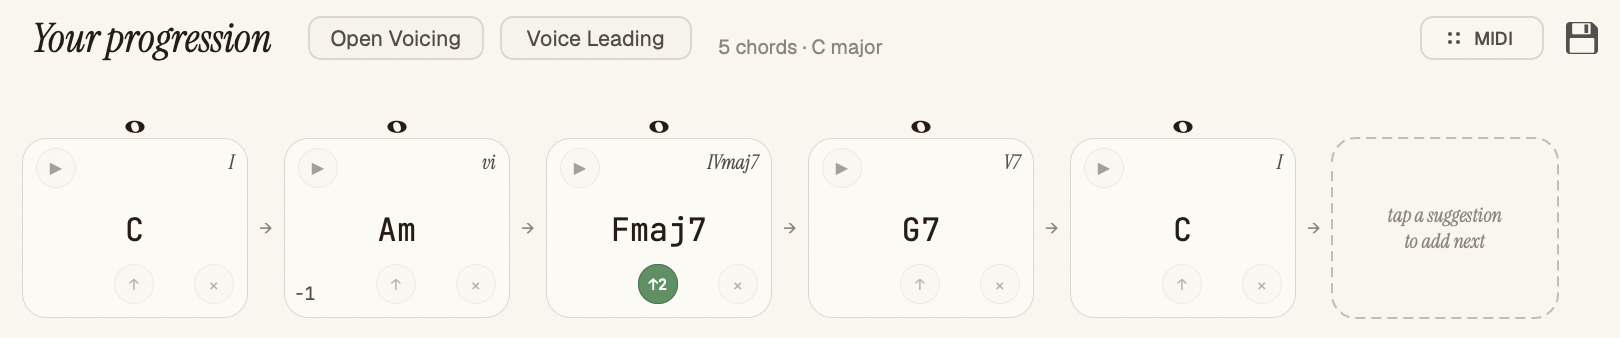
This is where the fun happens! In this section, Cadence will display your current harmonic progression, including chords and their properties, modulations to new keys, and what sort of voicing is being used.
Chord Cells
Each chord is represented by a single chord cell.
Chord Name and Roman Numeral
The chord's name is shown in the center of the cell. In the top right, the roman numeral is displayed representing the function of the chord within the current key (if available - for example, related ii chords for secondary dominants may not have a function in the current key). Underlined roman numerals indicate the chord is an altered chord. Changing the key will update the chord name to the appropriate enharmonic equivalent and update the roman numeral. Hover the mouse over a cell to get a tooltip with the notes within that chord, from top to bottom order.
Preview
You can preview the chord by clicking the preview play button in the top left of the cell.
Octave Transposition
You can quickly transpose the chord up or down an octave by clicking on the up and down arrow buttons. If the chord has been transposed, you will see an indicator (such as -1, +1) in the bottom left and right corners. You can also change the chord's octave transposition in the Build a Chord section in edit mode.
Inversion
You can quickly cycle through the various inversions of the chord by clicking the inversion button at the bottom center of the chord cell. If the chord is inverted, the inversion button will be highlighted and indicate which inversion is currently selected. You can also change the chord's inversion in the Build a Chord section in edit mode.
Delete
You can remove the chord from the progression by hovering over the chord cell and clicking the delete button in the top right of the cell.
Rearrange
You can change the position of a chord cell within the progression by clicking and holding a cell and then dragging it to the newly desired position.
Note Duration
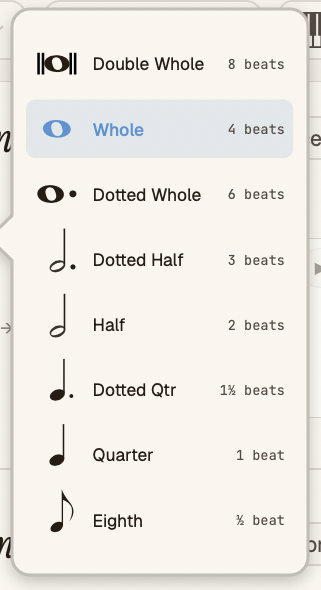
Above each chord cell is a note duration icon. This indicates how long the chord will be played for during playback and in the MIDI output.
Cadence supports 8 beat, 6 beat, 4 beat, 3 beat, 2 beat, 1 beat, and 1/2 beat durations, which should work for 4/4, 3/4, 6/8, and other common time signatures.
Choose a new duration for the chord by clicking the note duration icon and selecting the desired duration from the note duration popup.
Ties
You can tie to identical chord cells together by clicking on the tie icon in between the top corners of the cells. You can untie them by clicking on the icon a second time. Tieing cells together sums their durations when it comes to playback length and for MIDI export.
Measure Indicators
If you have set a meter for your progression (that is, something besides free meter), Cadence will display measure indicators above the chord cells. It also validates duration for each measure, indicating whether that measure has too many or too few beats in it.
Voicing and Voice Leading

By default, Cadence adds chords to the progression in closed voicing (that is, all notes are within a single octave with a few exceptions like hybrid and polychords).
Open Voicing
The Open Voicing toggle changes the note distribution in each chord to span more than a single octave, following the harmonic series as best as possible. This setting effects all chords in the progression and chord suggestions.
Voice Leading
The Voice Leading toggle changes the note distribution in each chord after the first chord based on classical voice leading principles as best as possible. You can adjust the inversion and octave transposition of the first chord cell and voice leading mode will automatically re-voice subsequent chords. This setting effects all chords in the progression and chord suggestions.
Voicing Options
The voicing options dialog allows you to set two additional voicing configurations:
- Equal voice mode, which forces all chords in the progression to have the same number of voices. It finds the chord with the most number of voices and then doubles the appropriate voices in other chords to match that number. This is especially helpful if you want a set number of voices across all chords in the progression for things like string arranging.
- Double the bass, which allows you to double the bass note for each chord in the progression down one or two octaves.
Edit Mode
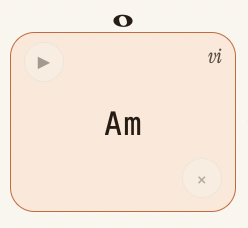
Clicking on a cell enters edit mode for that cell. This allows you to edit the chord in the Build a Chord section, including changing the tonic, the quality, extensions, the octave transposition, and the inversion. You can then save your changes back to the cell.
Additionally, edit mode also allows you to replace the chord with other suggestions from the chord suggestions section. Suggestions will be based on the chord that precedes this chord.
Insert Chord or Key Change
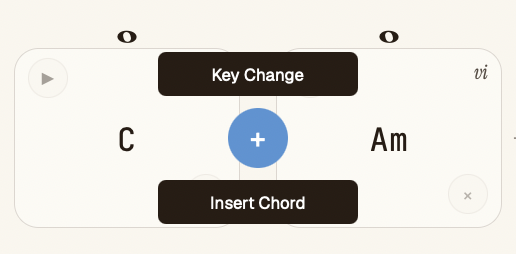
If you click on the arrow between two chord cells, you get the option to insert a new chord cell or to insert a key change if you want to modulate.
Key Change
Inserting a key change will show the key change popup. This allows to select which key you want to modulate to. All subsequent chord suggestions and roman numerals for existing cells will be now based on this new key center.
Insert Chord
Choosing Insert Chord will give you two additional options: duplicate the previous chord (if applicable) or insert a new cell. Duplicating the previous chord will insert a new cell with the exact same chord configuration as the previous cell. Inserting an new cell will create an empty "rest" cell in between the two chords. You will automatically be in edit mode so you can easily choose a new chord suggestion to place in this cell or you can leave it as a rest if that's desired for your progression.
MIDI Drag-n-Drop
The MIDI button in the top left of the section allows you to drag and drop the MIDI for your progression into your DAW. It preserves all transpositions, inversions, voicing changes, and (if applicable) patterns for your progression.
Save Progression
Click the Save button in the top left of the section to save the progression. It saves all transpositions, inversions, voicing changes, and (if applicable) patterns for your progression.
Chord Suggestions
The What could come next section is at the heart of Cadence. Here you'll find various chord suggestions, contextually presented based on your progression.

Chord Categories
Cadence contains chords based on common musical categories. These include chords diatonic to the current key, secondary dominants, and chromatic chords including augmented 6th chords and chromatic mediants. Some categories only appear when relevant, such as tritone substitutions, deceptive resolutions, polychords, and pivot chord suggestions for modulations.
Chord Suggestions
Chord suggestions are shown within each category. They are color-coded as classic pathways, colorful twists and detours, and distant, spicier explorations based on common music theory principles. Each suggestion can be previewed by clicking the play button on the suggestion. The suggestion can also be edited in the Build a Chord section by clicking on the pencil icon. Clicking on a suggestion will add it to the end of the progression. You can also click and drag the chord to drop it anywhere in the progression.
Chord suggestion colors are not hard and fast rules. And plenty of music exists with less common or surprising changes in the harmony. Don't be afraid to experiment!
Chord Type and Strength
Chord suggestions can be displayed based on their type (ex. diatonic, chromatic, etc.) or by their strength color (classic, color, explore). Use the filter toggle to switch between these modes.
Chord Tones
The Chord Tone filter allows you to show only the suggestions that contain a specific chord tone or tones. This can be especially handy when harmonizing melodies.
Special Case Chords
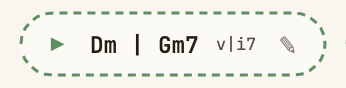
Normally a chord suggestion is added to the end of the progression. However, certain chord suggestions behave differently. These suggestions are shown with a dotted outline. Usually, these suggestions will replace the previous chord in the progression because they are equivalents or substitutions. Related ii chords are inserted before the previous chord in the progression.
Chord Variants
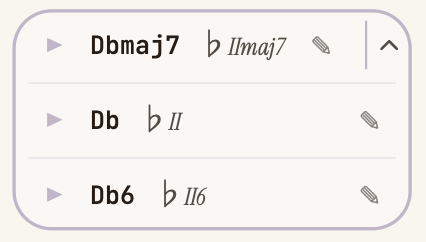
For certain chord suggestions, you can explore different variants of that chord, such as the triadic, 7th, or add6 versions. Click the drop-down caret on the chord suggestion to reveal the variants for that chord.
Create Your Own Chord
Cadence allows you to edit and build any chord you'd like in the Build a Chord section.
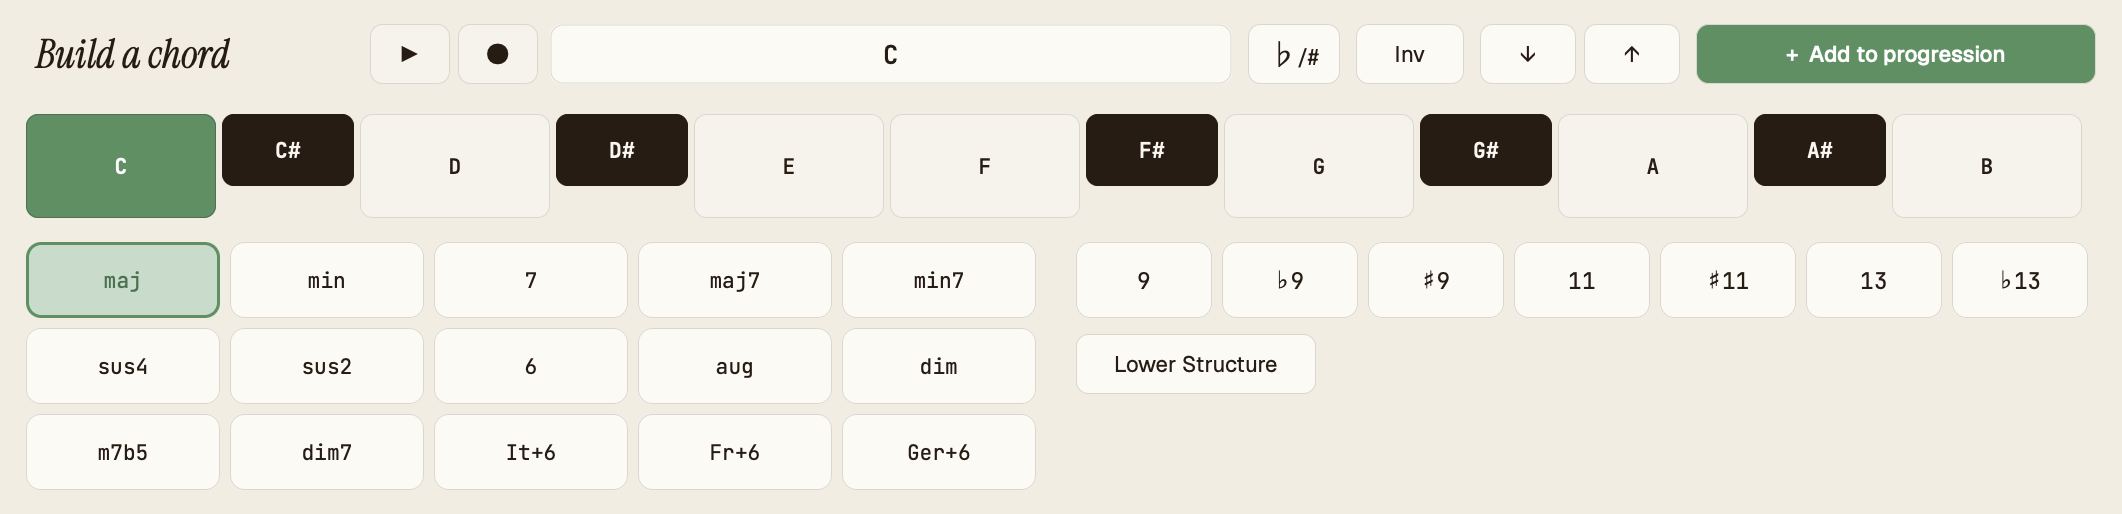
Preview
Use the preview play button to hear a preview of the currently shown chord. Enable MIDI Input Listen in the top toolbar and use your MIDI input device to play in the exact chord you'd like. Cadence will show the name of the chord, including quality and extensions based on the notes you play.
Many chords can be ambiguous and can be named in multiple ways. Cadence makes a best-effort attempt at detecting the played chord, but it won't always be what you had in mind. In those situations, you are free to edit the chord manually.
Remember to enable MIDI Input Listen if you are using Cadence as a virtual instrument and want to hear MIDI playback through it, including MIDI events from your DAW.
Enharmonic Spelling
Use the flat / sharp button to switch the enharmonic spelling of the chord.
Inversion and Octave Shift
You can utilize the inversion and octave shift buttons to change the voicing of the currently shown chord.
Chord Root and Quality
Use the chord name keyboard to choose the root of the chord. Then set its quality using the quality grid. Certain qualities can be combined, such as min and maj7.
Extensions / Tensions

You can add one or more extensions to your chord using the extension buttons. Cadence will automatically highlight common tensions for specific chords, as well as indicating harmonic avoid notes.
Lower Structures
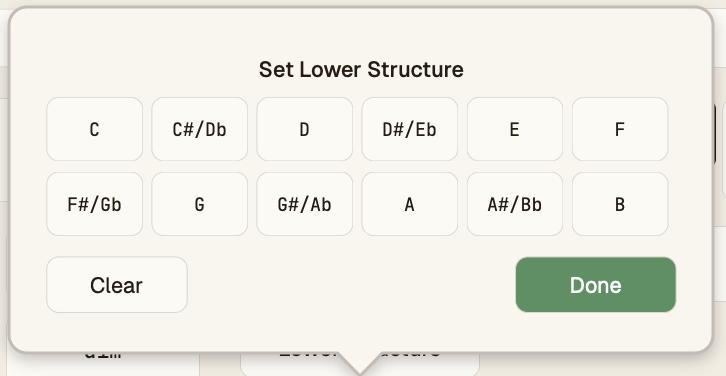
Use the lower structure popup to set and edit the lower structure for hybrid (slash) and polychords.
Import and Capture MIDI
Cadence allows you to both import MIDI files and to capture MIDI data from your DAW.
Import MIDI
To import an existing MIDI file into Cadence from your computer, use Import MIDI from the Options Menu in the top toolbar.
Capture MIDI
To capture MIDI from your DAW, use Capture MIDI from the Options Menu in the top toolbar. Cadence will automatically begin listening for incoming MIDI. You can use this to capture existing MIDI events in your DAW project or to play in MIDI from your MIDI keyboard.
Cadence listens for MIDI on the track it is on. It cannot receive MIDI from other tracks unless the MIDI output of those tracks is routed into the track Cadence is instantiated on.
Analyzing MIDI
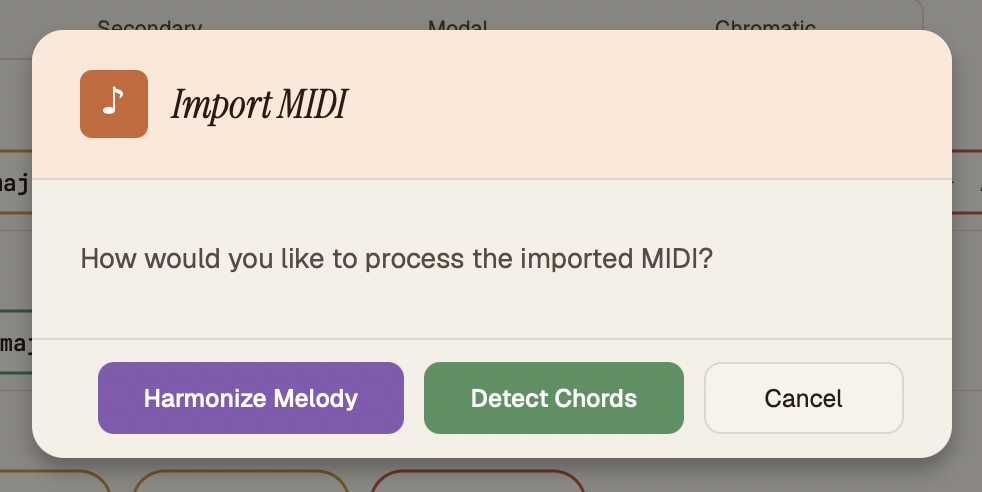
Cadence offers two ways to analyze the MIDI: harmonizing it with chords if it is a melody or detecting the chords from it and creating a progression.
Harmonizing Melodies
Once you have imported or captured MIDI, if the MIDI is a monophonic line (that is, only one note plays at any given time), you can use this as a melody to harmonize.
Harmonize Melody Options
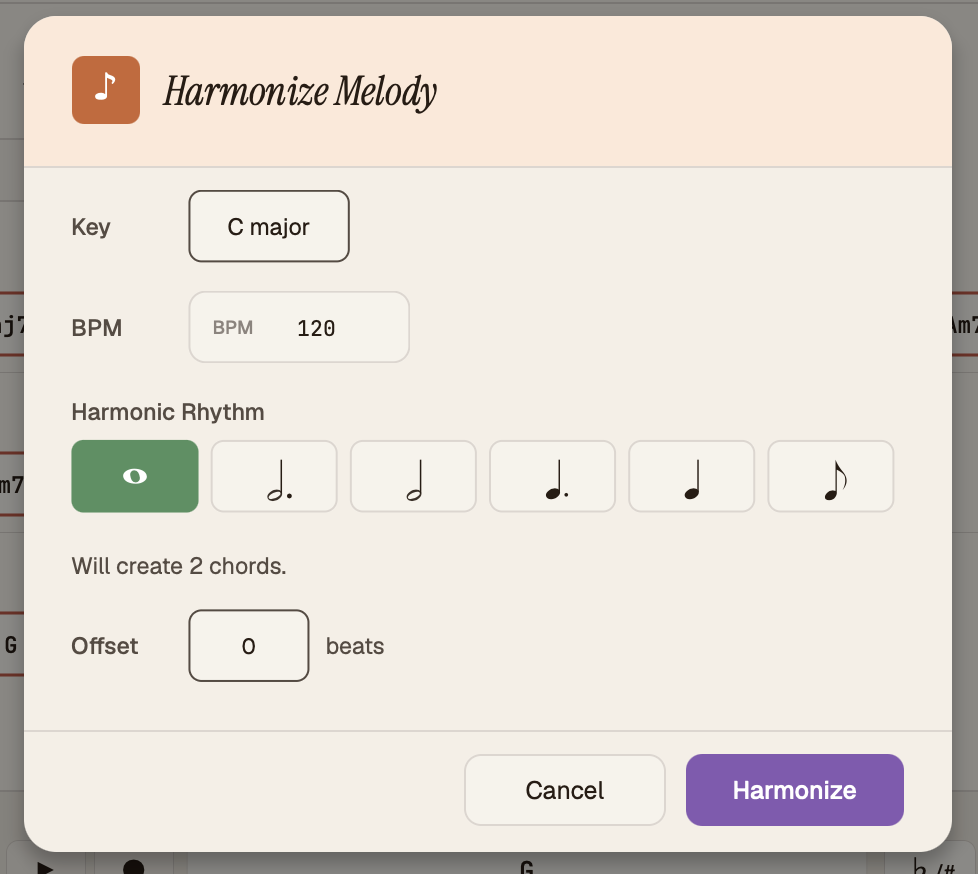
After choosing to harmonize a melody, a harmonization options dialog is shown.
Key
If you know the key of the melody or the key you would like to harmonize in, you can select it here. You can change this later from the key popup in the top toolbar.
BPM
If you want to set a specific BPM for the melody and progression, you can do so here. You can change this later from the BPM field in the top toolbar.
Harmonic Rhythm
Use this to set how often you want chords to change in the harmony (ex. every whole note, every half note, etc.). This will dictate which chord tones are selected to be harmonized. This is the most important setting in the dialog.
Offset
If you have a pickup bar in your melody, you can use this field to offset the analysis by a certain number of quarter note beats. You can also enter 0.5 or 1.5 for eighth note or dotted quarter pickups respectively.
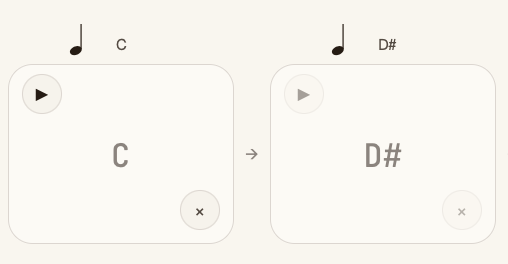
After you confirm, a placeholder progression will be created. Each chord cell will now show a specific melody note above it that is based on the harmonic rhythm chosen. Clicking on each cell will enter Edit mode. The Chord Tones filter will automatically be set to the melody note for that cell, so you will only see chords that contain that note - perfect for harmonization!
When you playback your progression, the imported melody will also playback alongside your harmony so you can hear how the two sound together. Use the volume slider in the top toolbar to adjust the volume of the melody and the harmony independently. You can also use the menu at the top right of the toolbar to select independent playback sounds for the melody and the harmony.
Cadence allows you to append imported MIDI analysis to your existing progression. You might find it beneficial to work in segments, so you can customize these settings (like harmonic rhythm) appropriately per segment.
You can significantly improve the detection by ensuring the notes in your MIDI file or event are quantized to the grid, both the starts and the ends. Also, for the best results ensure there are not multiple tempo events in the MIDI.
Detect Chord Progressions
Once you have imported or captured MIDI, if the MIDI is a polyphonic line (that is, multiple notes play at a time), you can let Cadence try to detect the chord progression used. You can even import multi-part MIDI files and detect their chord progressions (for example, a string quartet or a piece for full orchestra).
Detect Chord Options
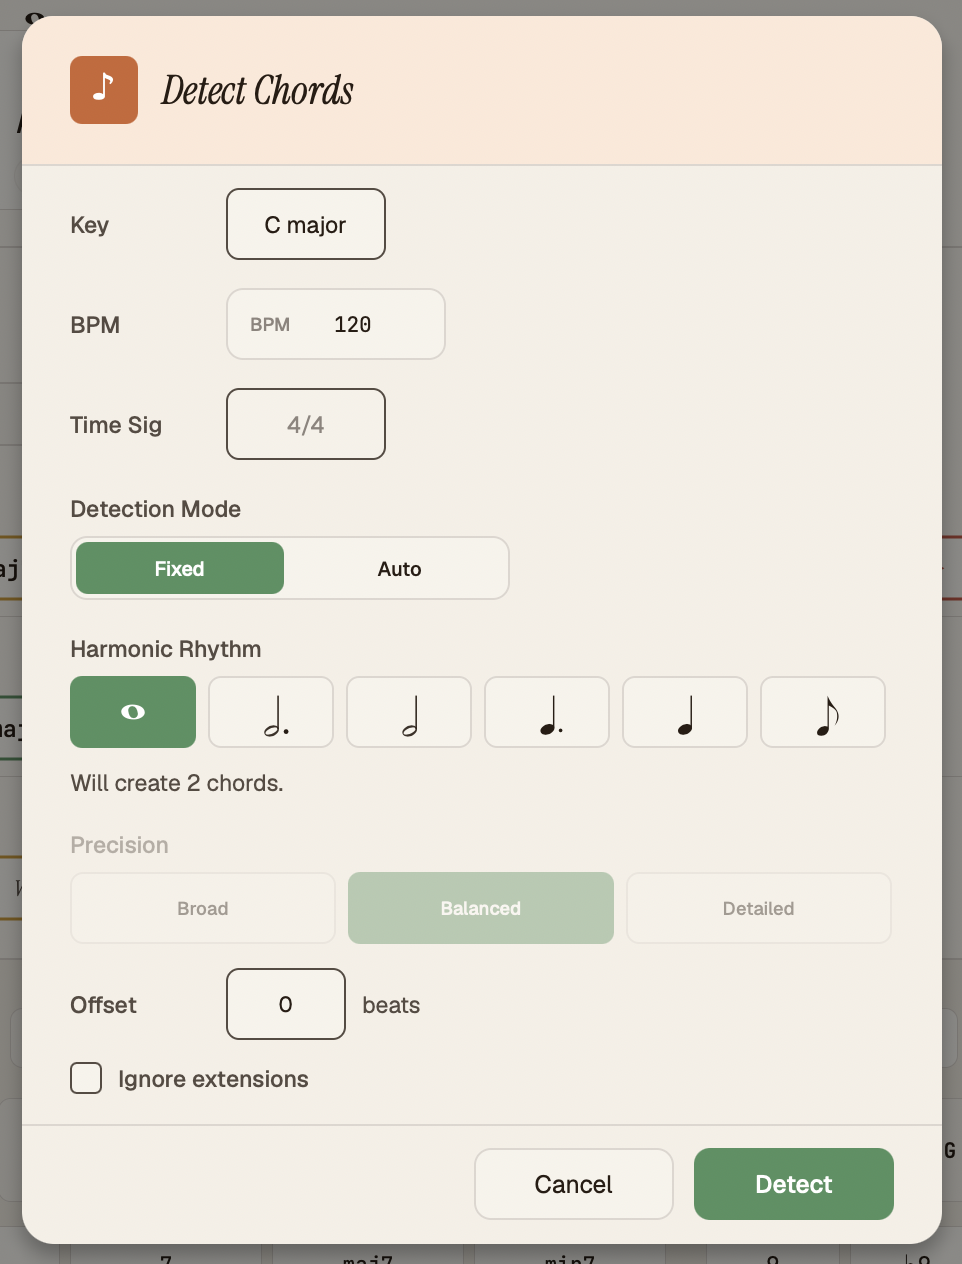
After choosing to detect chords, a detect chords options dialog is shown.
Key
If you know the key of the passage, you can select it here. You can change this later from the key popup in the top toolbar.
BPM
If you want to set a specific BPM for the progression, you can do so here. Cadence auto-detects this from the MIDI if available.
Meter
In order to get more accurate detection, specific the time signature your MIDI pasage is in. You can also choose the beat grouping when appropriate.
Detection Mode
You can choose whether to set a fixed harmonic rhythm for the chord detection (useful if you know the harmony changes on consistent intervals) or allow Cadence to try to determine harmonic rhythm changes (potentially less accurate, but able to pick up inconsistent harmonic rhythms).
Harmonic Rhythm / Minimum Harmonic Rhythm
Use this to set the fixed harmonic rhythm or in auto mode, the shortest expected harmonic duration.
Precision
In Auto mode, this controls how granular Cadence's chord detection will try to be.
Offset
If you have a pickup bar in the MIDI or want to trim the starting notes, you can use this field to offset the analysis by a certain number of quarter note beats. You can also enter 0.5 or 1.5 for eighth note or dotted quarter pickups respectively.
Ignore extensions
If your MIDI contains a lot of melody or passing notes between the harmony, this checkbox can help improve the chord detection's accuracy by excluding those extensions from signifying legitimate chord changes.
After you confirm the options, Cadence will analyze the imported or captured MIDI and create a chord progression. Each cell will also indicate the rhythmic duration based on detection.

You can use the re-analyze button in the top right of the progression section to change the analysis configuration and parameters for your MIDI input. This can be a easy way to try different analysis settings to see which one works best.
Chord detection is not fool-proof and amiguous chords or modulations are hard for Cadence to detect. You also might need to test different detection modes, harmonic rhythms, and precision settings to see which works best for your MIDI. Cadence allows you to append imported MIDI analysis to your existing progression. You might find it beneficial to work in segments, so you can customize these settings (like harmonic rhythm) appropriately per segment.
You can significantly improve the detection by ensuring the notes in your MIDI file or event are quantized to the grid, both the starts and the ends. Also, for the best results ensure there are not multiple tempo events in the MIDI.
Pattern Mode
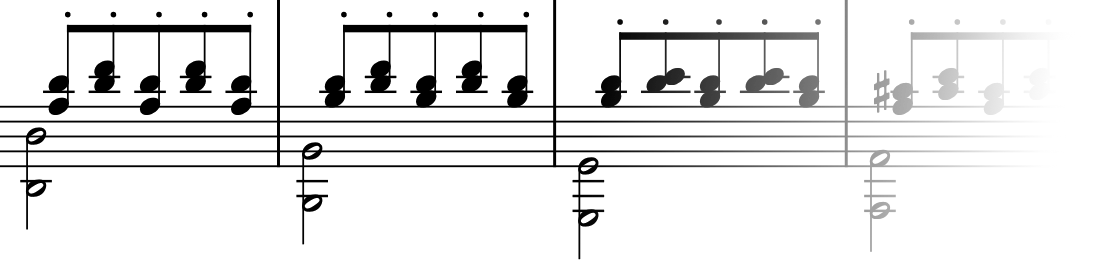
Music often consists of patterns, especially for harmony parts. Sequences of notes and rhythms that repeat over chord changes. Pattern mode allows you to simulate that within Cadence for your chord progression.
Pattern mode lets you to record a specific gesture (or pattern) and apply that automatically to all chords in the progression. Think of it like a more flexible, intelligent arpeggiator of sorts. You can record a 1 or 2 bar pattern or gesture using the notes from the first chord of your progression. This pattern will then be automatically applied to the subsequent chords in the progression. Cadence will intelligently handle how the pattern is applied if the chords have more or less notes than the first chord. It will even figure out open voicing and voice leading if those are enabled.
Create Pattern Options
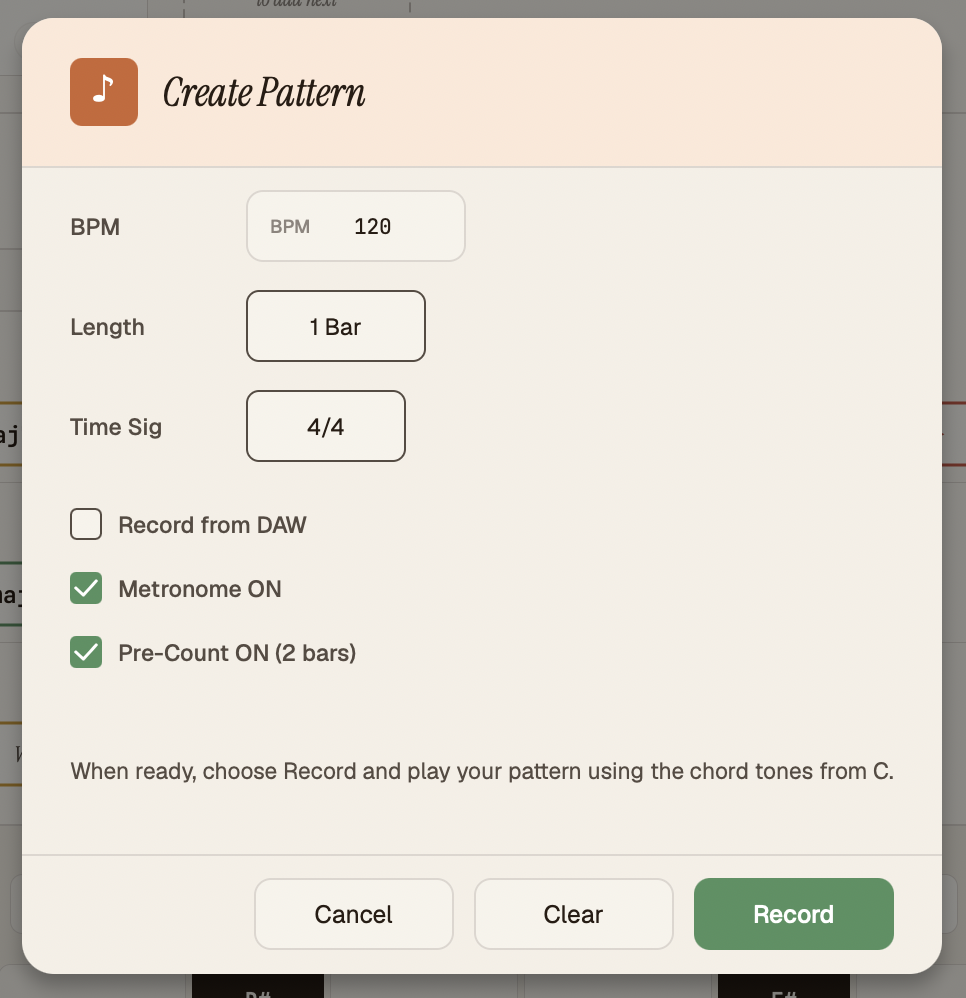
After enabling pattern mode in the top toolbar, the create pattern dialog is shown.
BPM
You will need to set a specific BPM before recording your pattern. The recording metronome will be based on this.
Length
You can record a 1 or 2 bar pattern.
Meter
You will need to set a specific time signature before recording your pattern. You can also choose a beat grouping when appropriate. The recording metronome will be based on this.
Record from DAW
This option allows you to capture pre-existing MIDI data from your DAW if you'd like to use that for the pattern.
Soft Quantize
This will quantize your pattern recording to the nearest 1/16th note.
Metronome ON
This plays back a metronome during the pattern recording.
Pre-Count ON
When turned on, there will be a 2 bar pre-count before the pattern starts recording.
Clear
If you have an existing pattern, use this to clear it out for the current progression.
After you confirm the options, hit Record to start the pattern recording. If you are recording from your DAW, start playback in your DAW and Cadence will capture the MIDI from the track it is instantiated on. After recording is complete, you can preview the recorded pattern, re-record, or save the pattern.
Once a pattern is saved, when you playback the progression, each chord cell will play using the saved pattern. If you export your progression as MIDI or to the DAW, each chord will have the pattern applied as well. Saving a progression also saves any saved pattern for that progression.
Strict Pattern Mode
Strict Pattern Mode allows you to restrict the pattern application just to the voices you played. That means if subsequent chords in the pattern have more voices than what you played, those will not play while pattern mode is active.
If you are a skilled keyboard or piano player, live recording your pattern will likely give you the most freedom and fun to create interesting gestures. However, recording the pattern from your DAW can also be very handy, especially if you want to manipulate your pattern's MIDI first (ex. apply quantization).